On a recent engagement, an interesting hardware side quest popped up. A client had found a keylogger and, naturally, we wanted to know what the adversary had seen and if we could gather any useful traces towards the perpetrator.
Since our analysis included some twists, we decided to document parts of our process to perform a forensic analysis on a keylogger. We hope to shed some light on the forensic possibilities and encourage others to expirement with similar hardware.
Passive Reconnaissance
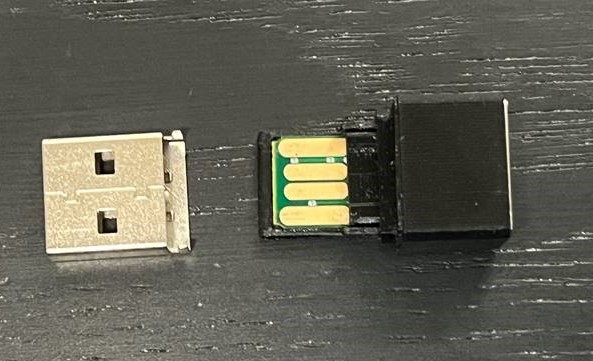
Hardware keyloggers come in various shapes and sizes. The one we got, that was yanked from a computer in a public area, was no larger than a fingernail. To some surprise it was 3D printed, as the layers were visible.
Of course, our first goal was to identify the device in front of us. What is it capable of? Is there any sort of documentation we can leverage? And although it looks just like any other keylogger, we started with some passive reconnaissance to confirm our first assumption.
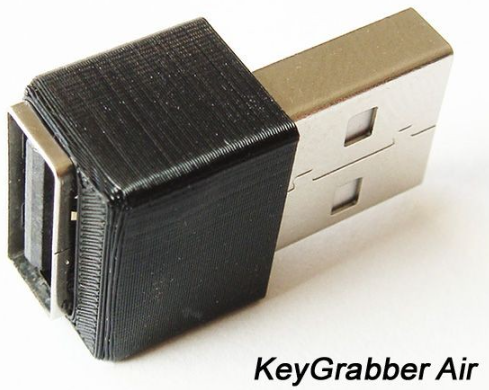
To our amusement, finding the exact model and documentation was just a single image search away. Simply taking a picture and using reverse image search, we immediately identified the „KeyGrabber Air“.
At this point we had a rough idea of what this device could do. Most notably, it could be used for:
- Capturing and storing keystrokes (no injection)
- Open a WLAN to host a web interface that shows settings and keystrokes
- Connect to a WLAN to send keystrokes via FTP or SMTP
Active Reconnaissance
After powering on the device via the USB port, we noticed a new WLAN appear with the SSID „AP001“. This matched the documentation we found earlier. However, the network required a password and it was neither a common password such as „password“ or any other default credential we could find in the documentation. We also could not identity any sort of key combination (such as K+B+S) that would grant us administrative access, as it has been the case with other keyloggers.
Hence, we asked for permission to apply some more intrusive techniques. Once we received a thumbs up from the client, we opened the case and got to the circuitry.
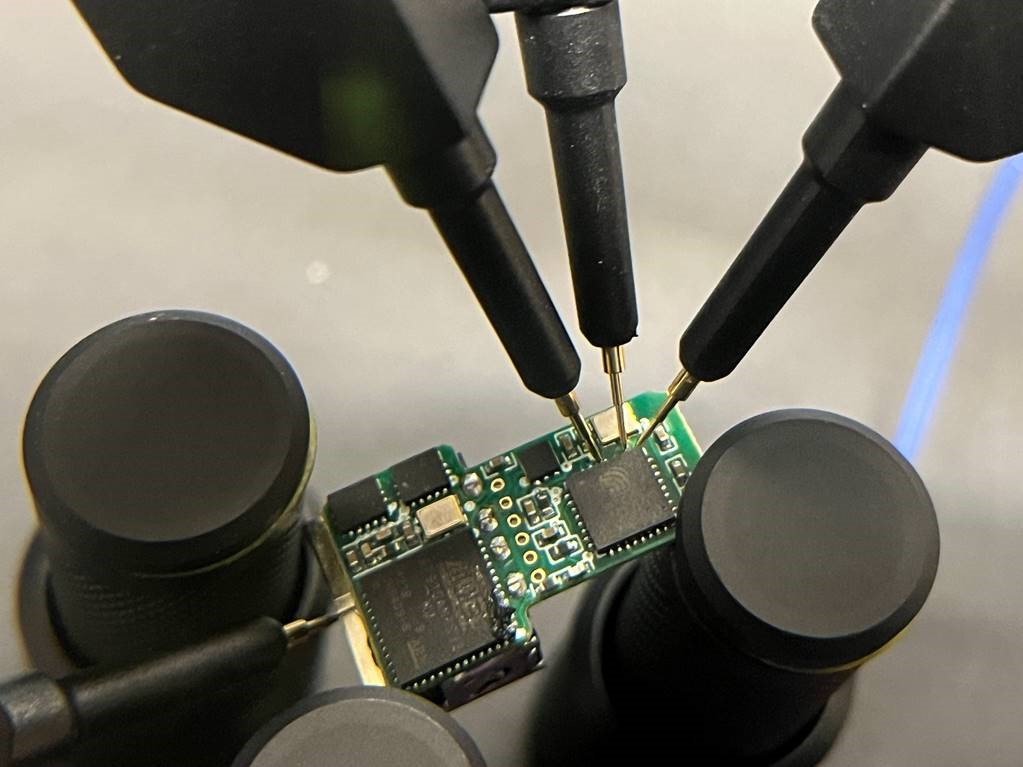
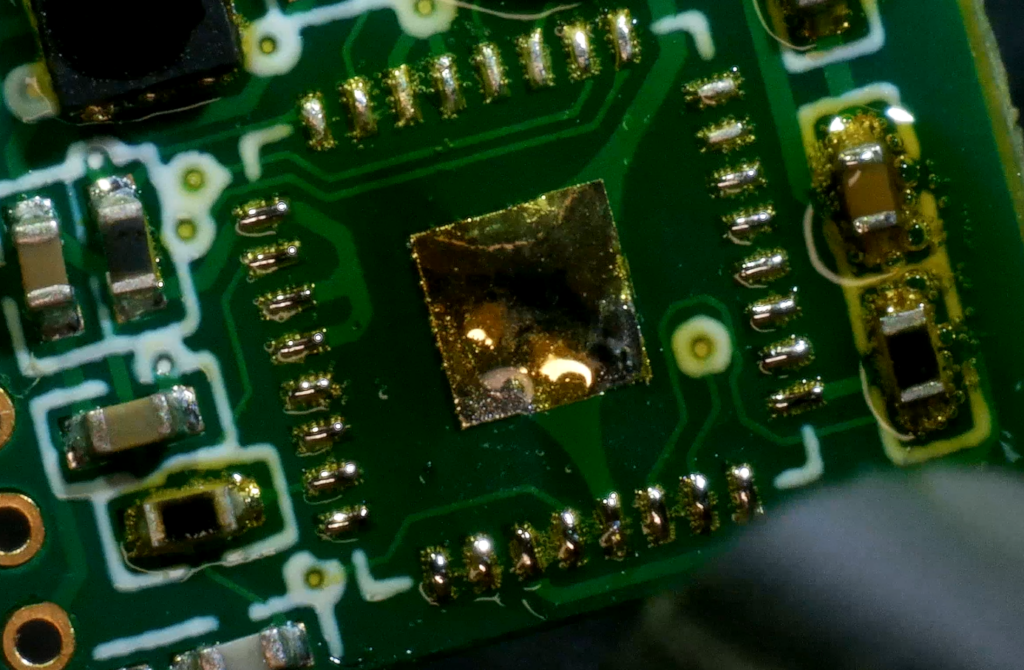
As the figure above shows, there are only two core components on the board. On the bottom left you can see an ATMEL AT91SAM7S32 MU and on the right an ESP8285. The data lines from the USB ports are directly connected to the AT91SAM7S32, which indicates that this chip may be responsible for parsing the differential signals and extracting the key values. Of more interest to us is the ESP8285 which is a common chip for wireless applications and also connects to a small antenna on the PCB.
Unfortunately, neither the connectors (golden circles) in the middle, nor a direct connection with a Sensepeek PCBite to the ESP gave us access to the chip. Our assumption is that the passive components and connections on the board interfered with our attempts to communicate with the ESP8285 directly.
Our goal was to hook up to UART, the debug interface of the chip, to dump its memory. Thus, we once again asked for permission to proceed and were given the green light to desolder the ESP. Word of caution: make sure to check the datasheet of the components you want to desolder for allowed temperatures in advance to avoid the risk of damaging anything. A small nozzle and a rather low airflow prevents the passive components on the side from getting blown away. I can also recommend preheating the board, to heat large ground pads.
Since the ESP is tiny and needs some passive components to function, we decided that it would be easiest to just install it on a developer board for easy access. Thus, we got ourselves a cheap dev-kit like this:
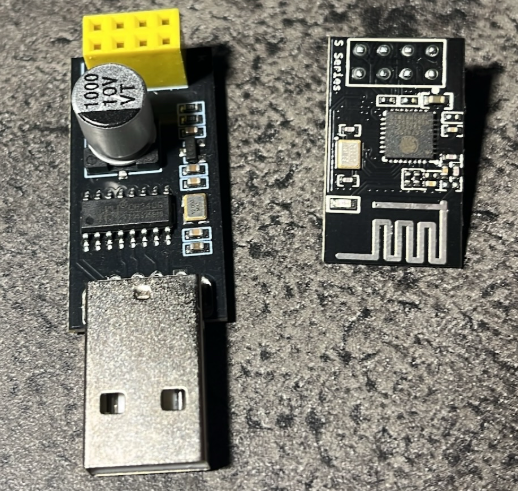
This set exposes the UART interface (board on the right) and includes a UART to USB converter (left).
We desoldered the original chip, replaced it with the one we got from the keylogger and connected the board to a computer. Now, we could use esptool to finally dump the memory of the ESP. Note that the ESP8285 has an internal flash memory. Other chips may use an external flash chip, so you may be able to access the storage directly and don’t need to deal with the ESP/esptool.
With esptool we need the Baudrate (115200 is the default for this chip), the path to the USB device, the command (read_flash), a start address (0), the amount of bytes to read (in case of the ESP8285 flash that is 1 Megabyte) and a filename to store the contents.
$ esptool -b 115200 --port /dev/ttyUSB0 read_flash 0x0 0x100000 flash_1M_esp.bin
espool.py v4.7.0
Serial port /dev/ttyUSB0
Connecting....
Detecting chip type... Unsupported detection protocol, switching and trying again
Connecting...
Detecting chip type... ESP8266
Chip is ESP8285H16
Features: WiFi, Embedded Flash
Crystal is 26MHz
Uploading stub...
Running stub...
Stub running...
315392 (30%)
When esptool finished without errors, we had the entire flash content in a file.
Analysing the dump
As with any other binary file, we can save ourselves alot of trouble by just extracting all readable strings and start analysing them, before doing any reversing. However, the strings output on the binary showed tons of:
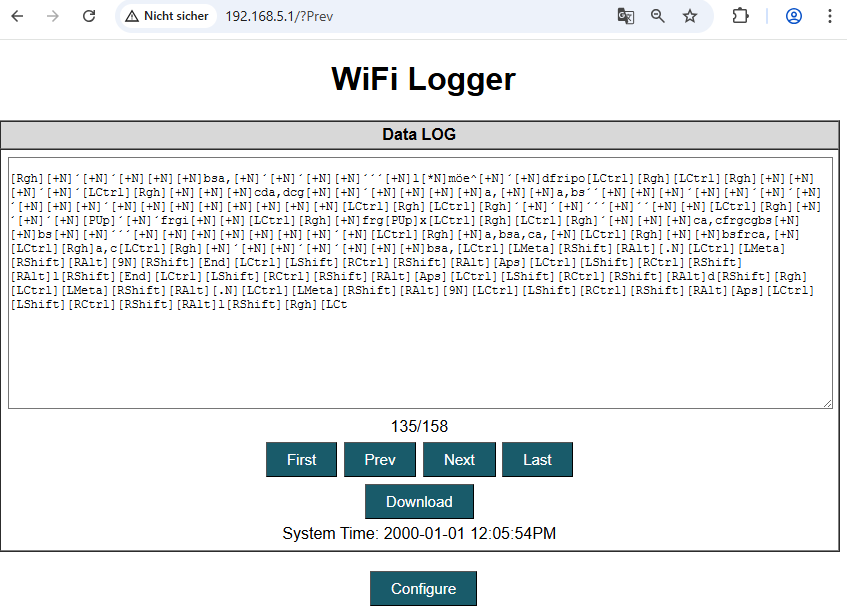
[N][+N][+N][+N]´[+N]´[+N][+N]´[+N][+N][+N][+N][+N]dckjhe^[+N]´x[+N]´[+N]´c[+N]´[+N]´[+N][+N][+N]a,[+N][F5]x[+N][+N][+N][+N]a,bsc[+N]a,[+N][+N][+N][+N]a,a,[+N][+N][+N][+N]a,[+N]c´[+N][+N][+N][+N]e^dc[+N][+N][+N][+N]´[+N][+N][+N][+N][+N][+N][+N][+N][+N][+N][+N]xx´[+N][+N][+N]bs[+N]a,a,[+N]c[+N][+N][+N]a,[+N][+N]c[+N][+N]a,[+N]bsa,[+N]´[+N]´[+N][+N]´[+N]´´[+N][+N][+N][+N][+N][+N]a,[+N][+N][+N]bsa,a,[+N]a,[+N][+N][+N][+N][+N]a,[+N]a,[+N][+N][+N]´[+N][+N][+N][+N]´[+N]´[+N]´[+N][+N]bsa,[+N]´[+N][+N][+N][+N]´[+N][+N][+N][+N][+N][+N]´[+N]a,[+N][+N][+N][+N]´[+N][+N][+N][+N][+N][+N]a,[+N][+N][+N][+N][+N][+N][+N][+N][+N]a,[+N][+N]´[+N][+N][+N][+N][+N][+N][+N][+N][+N][+N][+N][+N][+N][+N][+N][+N][+N][+N]
[+N]x[PUp][+N][+N][+N][+N]bsa,bs[+N][+N]a,bs[+N]c[+N][+N]´[+N][+N]´[+N][+N][+N]a,[+N]ca,
At first we were optimistic. There were strings like [LCtrl][Rgh]cbscbs[+N][LCtrl] which seemed like valid keystrokes. But the longer we studied the output, we could only make less and less sense of it. We thought, maybe the contents were encoded or maybe the memory got corrupted along the way.
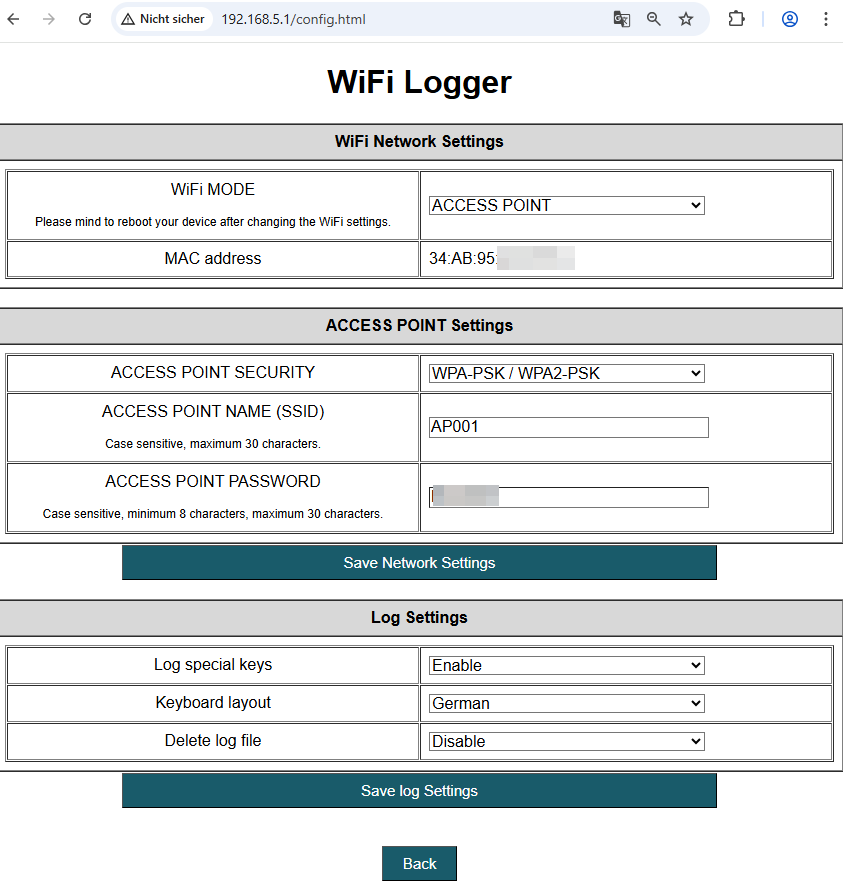
The initial feeling of success was followed by the depressing realisation that the output was useless. However, motivation quickly came back when we found the following intact and readable configuration in the strings output:
ap_name
AP001
ap_password
*******[redacted]
Unfortunately, it did not appear as if the adversary had specified any FTP or SMTP credentials. This could have been a great finding and a hint towards the identity of the perpetrator. However, equipped with the WiFi password, we would finally be able to access the keylogger dashboard.
Beware of rabbit holes. For quite some time we believed that the ESP firmware may hold some value and potentially we could decode the magic log strings when we just reversed the application. We would just have to convert the binary back to an ELF and then apply Ghidra. In hindsight, that step was completely unnecessary and although we learned quite a bit about ESPs and ELFs, it was not nearly as efficient as what we did next.

Put everything back together
We desoldered the ESP from the dev-board and put it back on the keylogger. At last, we successfully connected to the WLAN of the keylogger. Following another quick read of the documentation, we navigated to http://192.168.5.1 and finally:

This was not what we anticipated. Either we had corrupted the filesystem or something weird was going on. Every page of logged keystrokes contained nothing but nonsense. However, the configuration we extracted was intact. And indeed, the dashboard displays all data as we would expect.
Even the keyboard language was setup correctly. Still, apart from the WiFi password, we had no valuable insights for the investigation. And then a random idea struck. What if the adversary had mixed up the USB devices and plugged in a mouse instead of a keyboard?
So we placed the keylogger in a test environment, plugged in a keyboard and to our surprise it was logging without a single fault. Even bigger was the relief, when we plugged in a mouse – moved and clicked it a few times – and looked at the logs again:
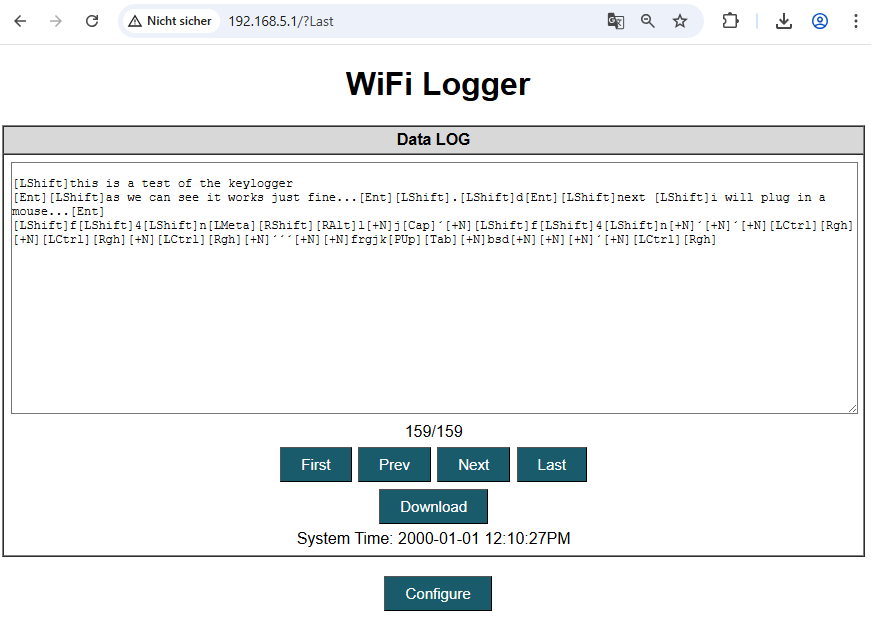
Only for the last two lines, we plugged in the mouse. And the output we see (notably lots of [LCtrl] and [+N]) shows significant similarities to the entire previous log.
At this point, we assessed, that the perpetrator most likely did not exfiltrate any useful information this way. Instead, with a high chance the keylogger was plugged in to USB device other than an ordinary keyboard.
Key Learnings
Keylogger forensics could uncover valuable information. Additionally, the process can be fairly straight forward. In this scenario we did not have to circumvent any physical protection mechanisms.
- Keep it simple (reverse image searching for a simple photo of the keylogger led us straight to the relevant documentation)
- Even though the default password was changed, retrieving it from the keylogger was as easy as running strings on the memory dump
- Dumping the memory also allowed us to extract unencrypted log files and keylogger settings immediately
- The keylogger configuration may contain some interesting information such as credentials for SMTP, FTP or a WiFi hotspot that could lead you straight to the adversary
- Adversaries make mistakes too, for example placing a keylogger between a computer and the mouse cable